Workflow Guide
End-to-end walkthrough — enabling the feature, initiating a split, reviewing data and financials, and verifying the result.
Order Split Workflow Guide
This guide walks through the complete flow — from enabling the configuration to verifying the split result in the bill list and activity log.
End-to-end workflow
1. Enable the feature
Before using Order Split, the Enable Bill Splitting flag must be turned on for the lab.
Navigate to Centre Dashboard → Configurations → Workflow Configurations → Workflows and toggle Enable Bill Splitting.
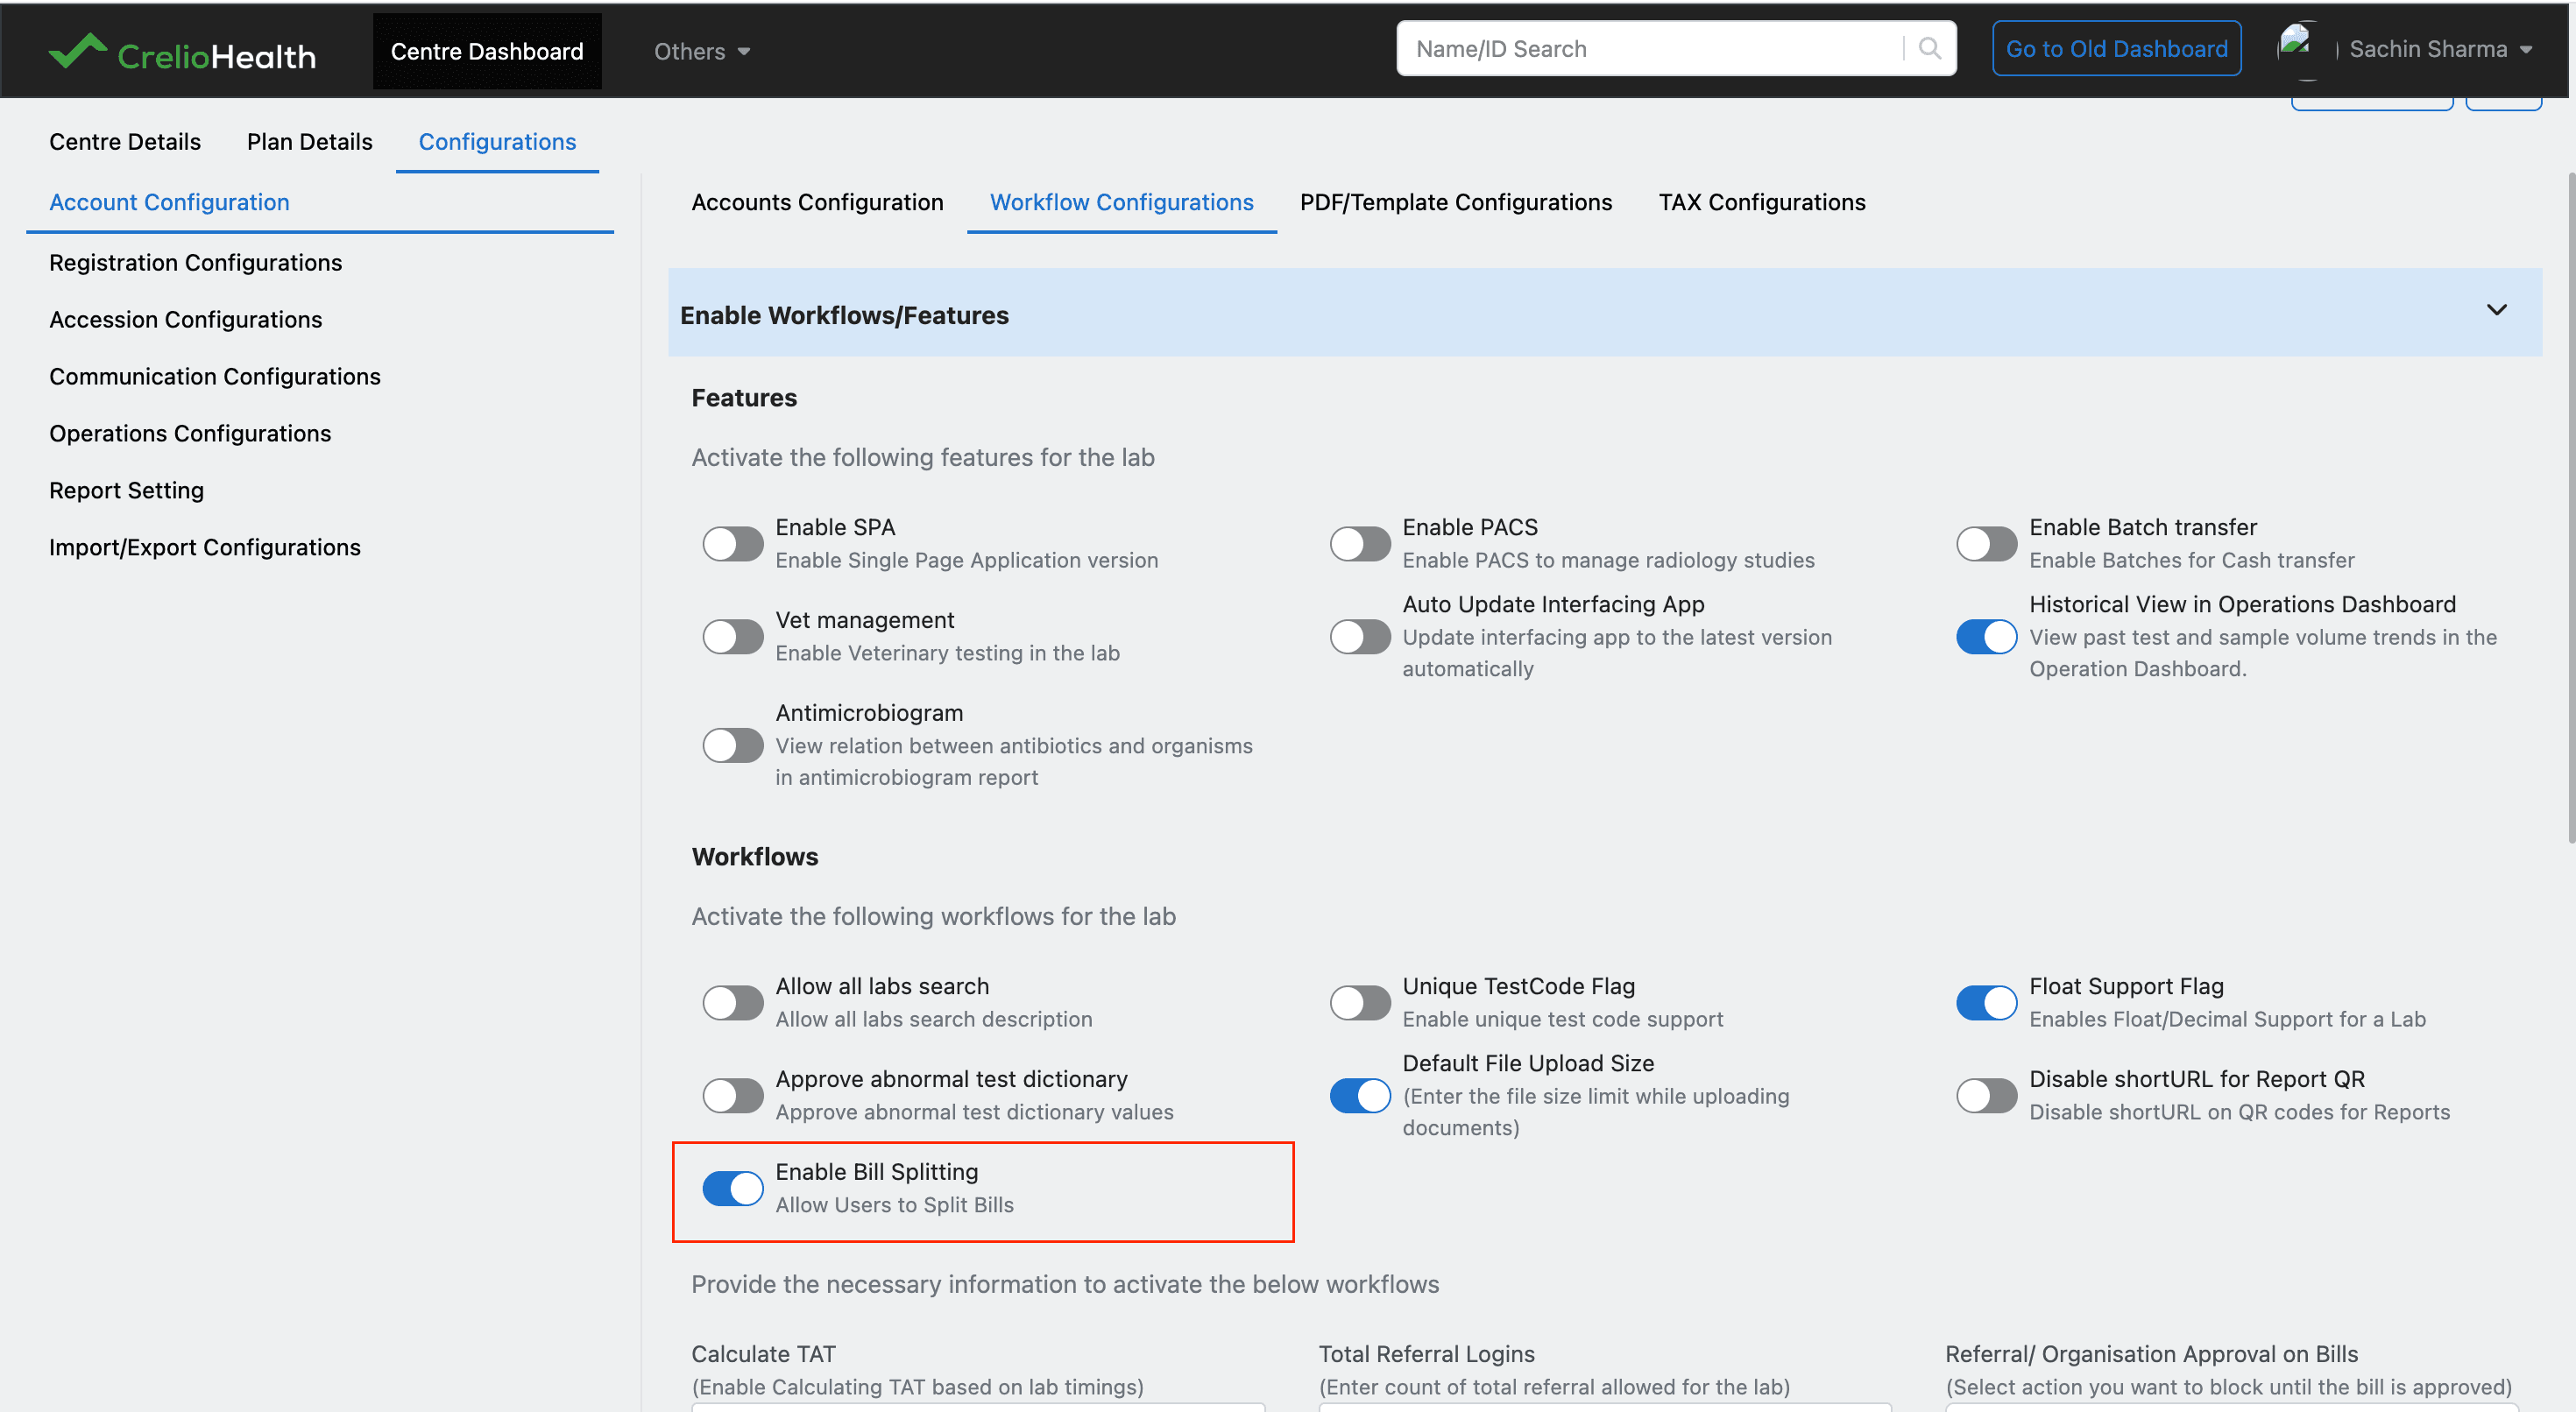
Only support-user logins can access this feature after the flag is enabled. Collection centre, referral, and doctor logins cannot initiate a split.
2. Open an insurance bill
Order Split is only available on unpaid insurance bills. Open the bill you want to split from Billing History.
The Split Bill button appears in the footer of the bill edit view, alongside Print and Cancel Bill.
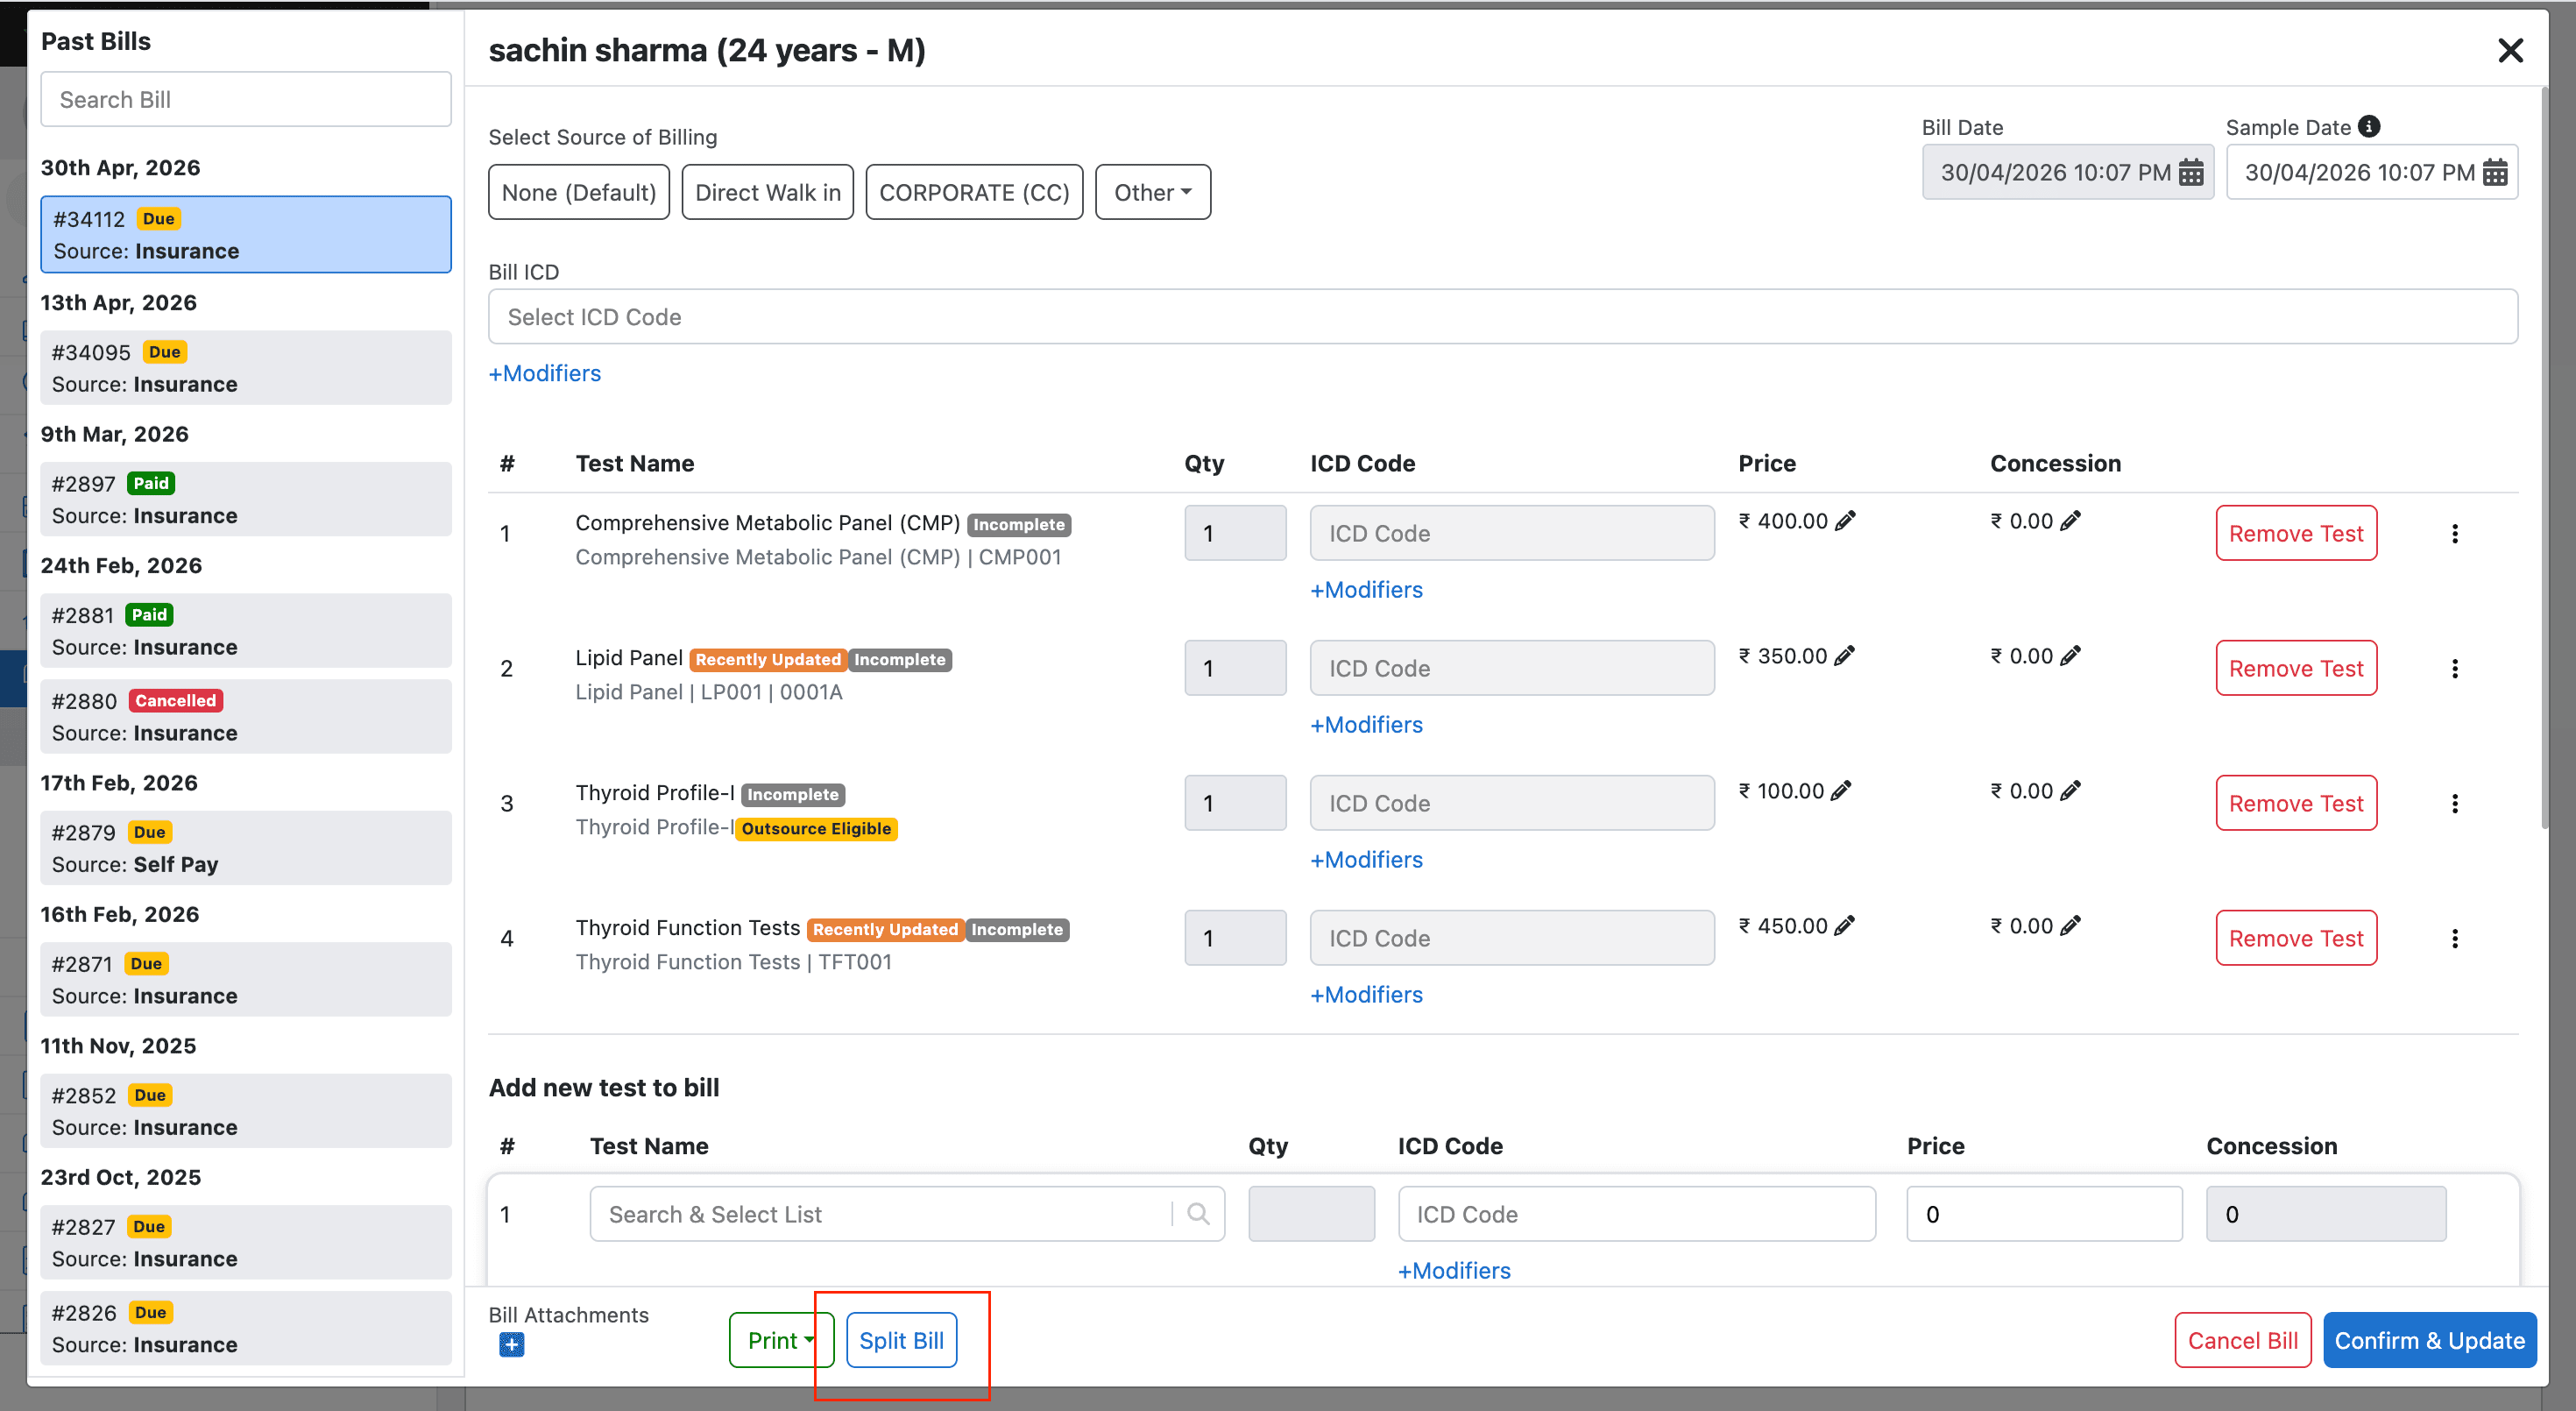
The button is disabled for bills that are locked, cancelled, refunded, written off, complete, or invoiced.
3. Step 1 — Select tests and set new source
Clicking Split Bill opens the Order Split Confirmation modal at Step 1.
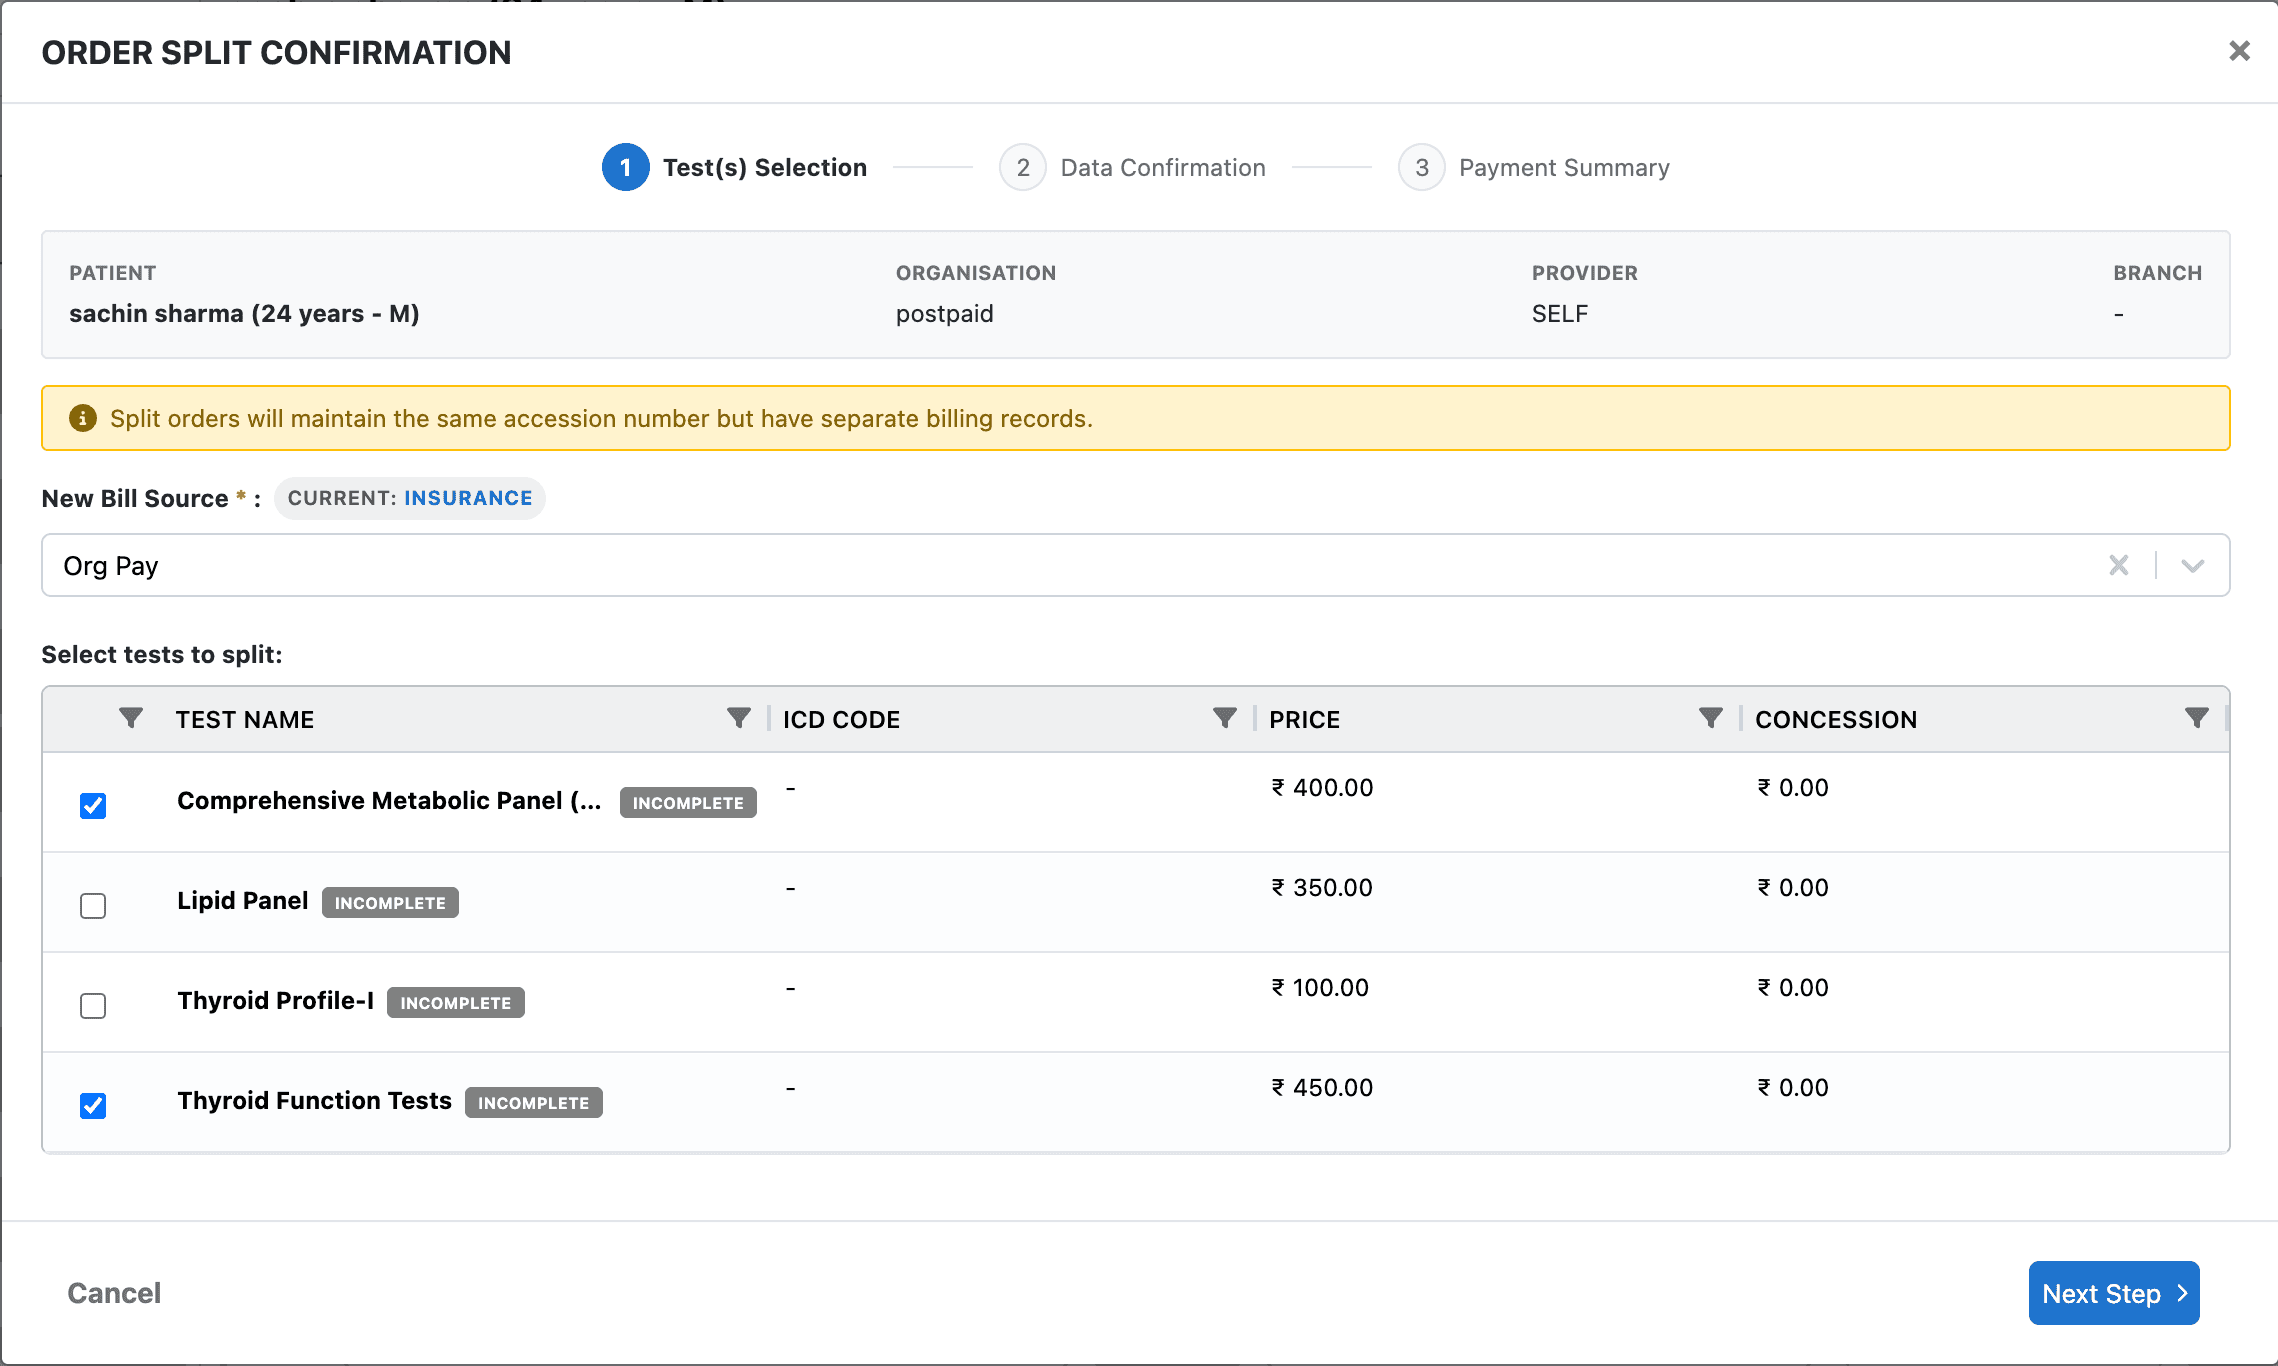
What to do on this screen
- New Bill Source — select the destination source for the split bill. Options are
Org Pay(default) andSelf Pay. The current source (Insurance) is shown for reference. - Select tests to split — check the tests you want to move to the new bill. Unchecked tests remain on the original bill.
Key behaviour
| Detail | |
|---|---|
| Minimum selection | At least one non-profile test must remain on the original bill after split |
| Profile tests | Selecting a profile also selects its child tests automatically |
| Validation | The backend runs eligibility checks in real time — errors are shown before you can proceed |
Click Next Step to continue.
4. Step 2 — Review data handling
Step 2 shows exactly how each entity will be handled when the split is executed.
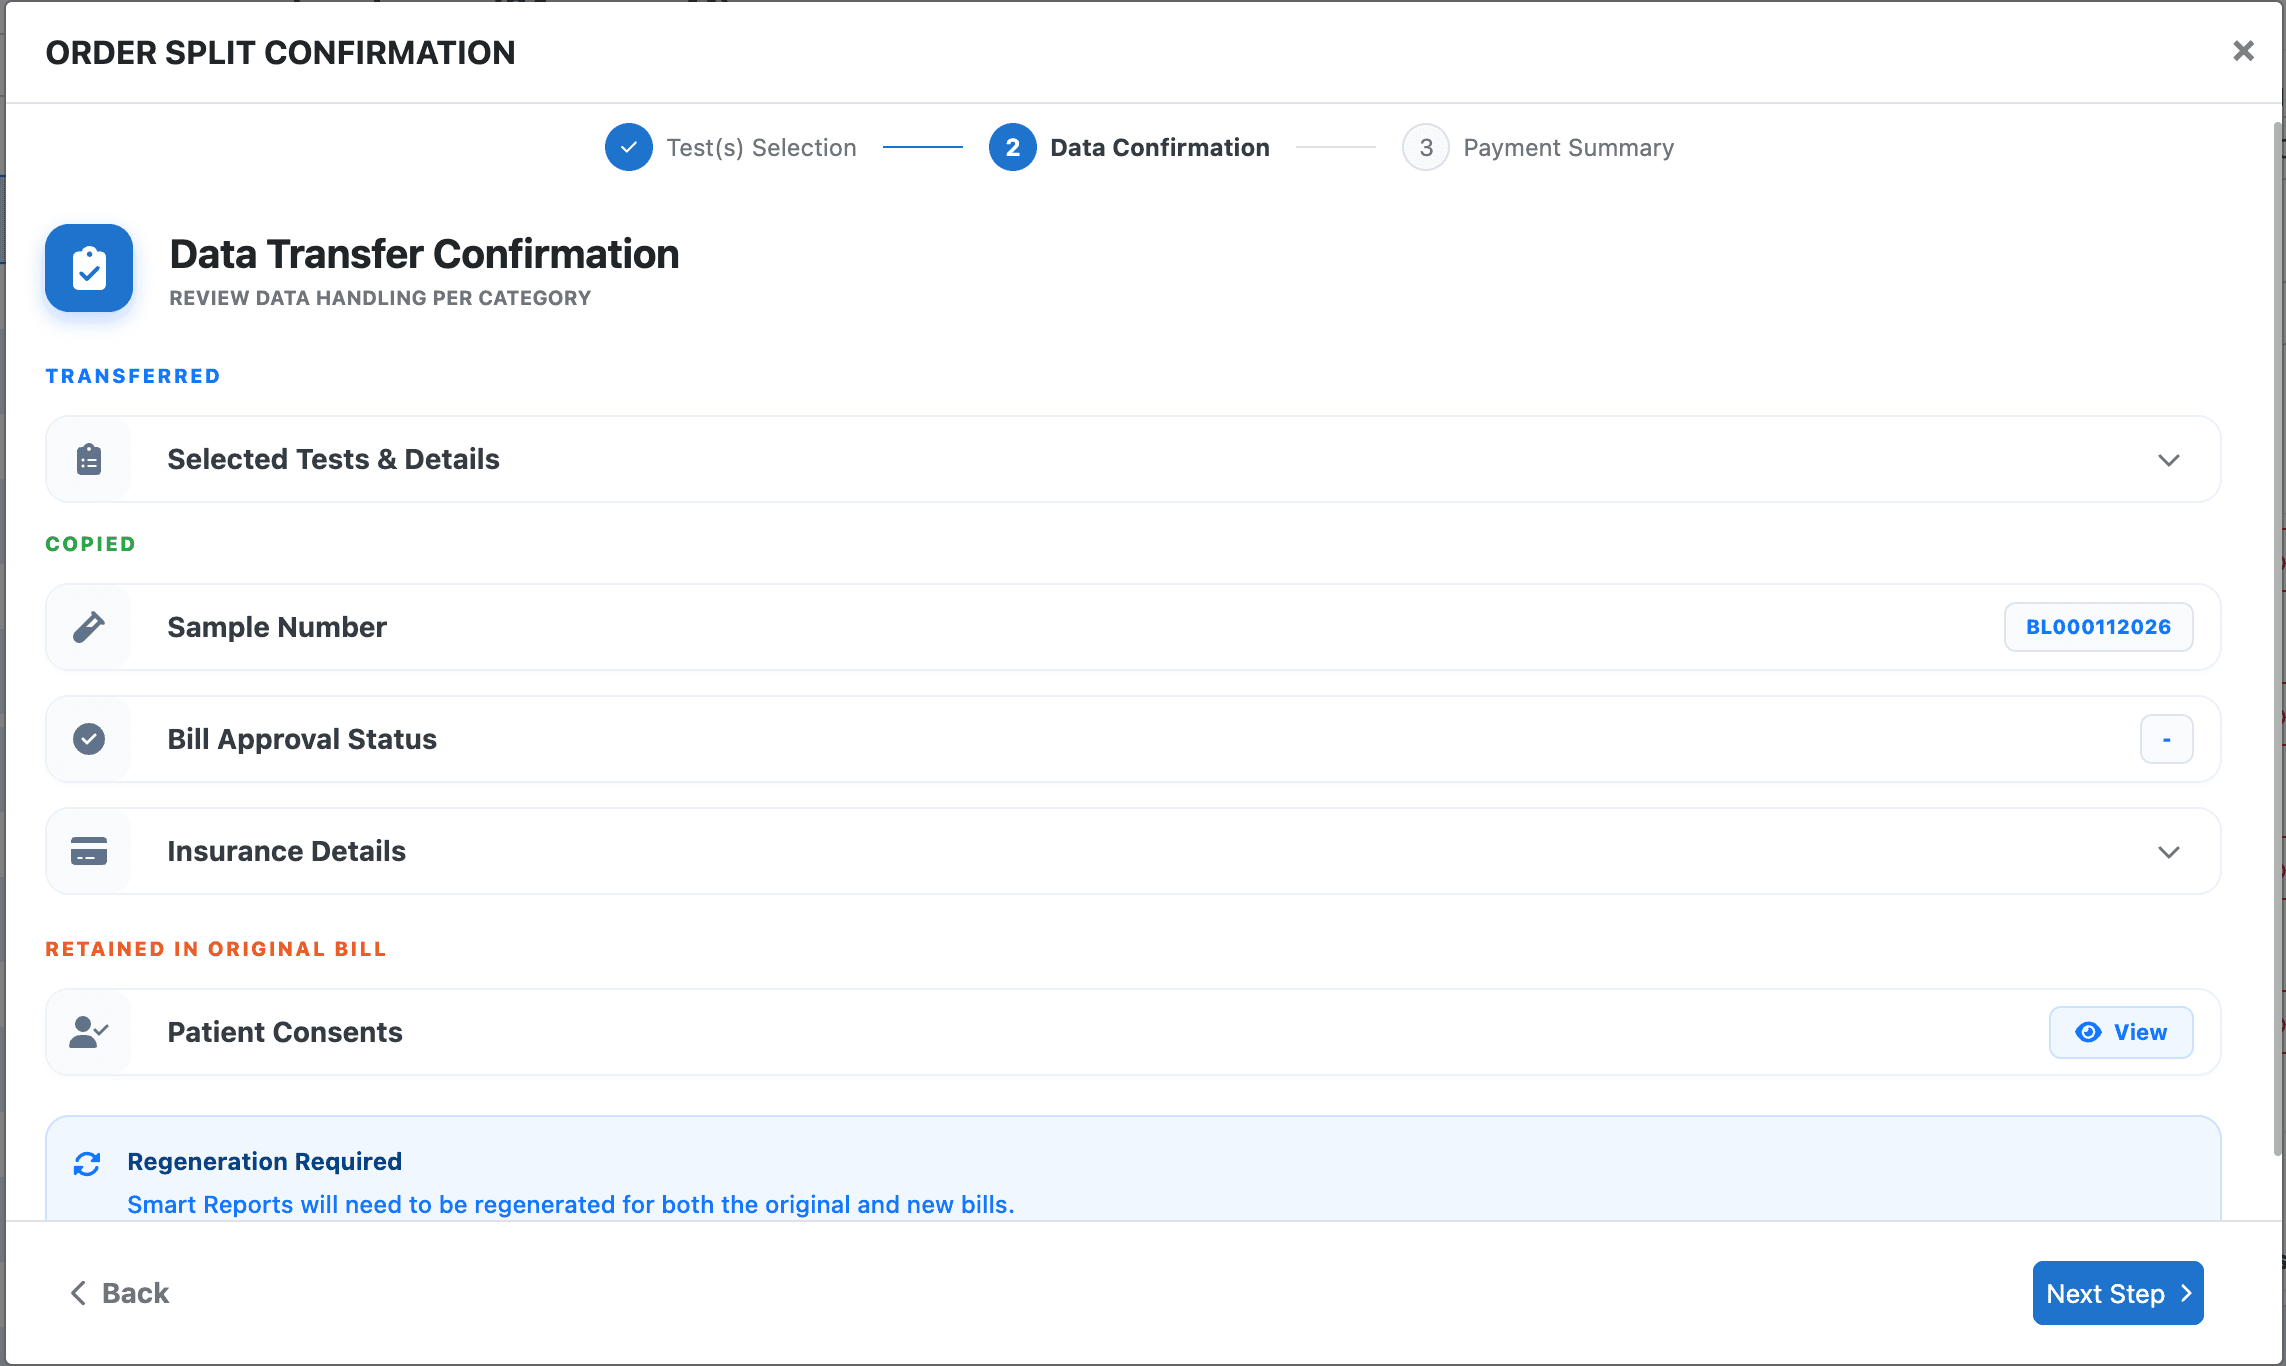
Categories shown
| Category | Meaning |
|---|---|
| Transferred | Entities that move to the new split bill (e.g. selected tests and their report details) |
| Copied | Entities cloned onto the split bill while the originals stay on the parent (e.g. Sample Number, Bill Approval Status, Insurance Details) |
| Retained in original bill | Entities that stay on the parent and are not moved or copied (e.g. Patient Consents — viewable but not duplicated) |
There is also a Regeneration Required notice at the bottom — Smart Reports are soft-deleted on the parent after the split; both bills will need report regeneration.
Review all categories and click Next Step to proceed to financials.
5. Step 3 — Review financials
Step 3 shows the financial impact of the split before any data is written.
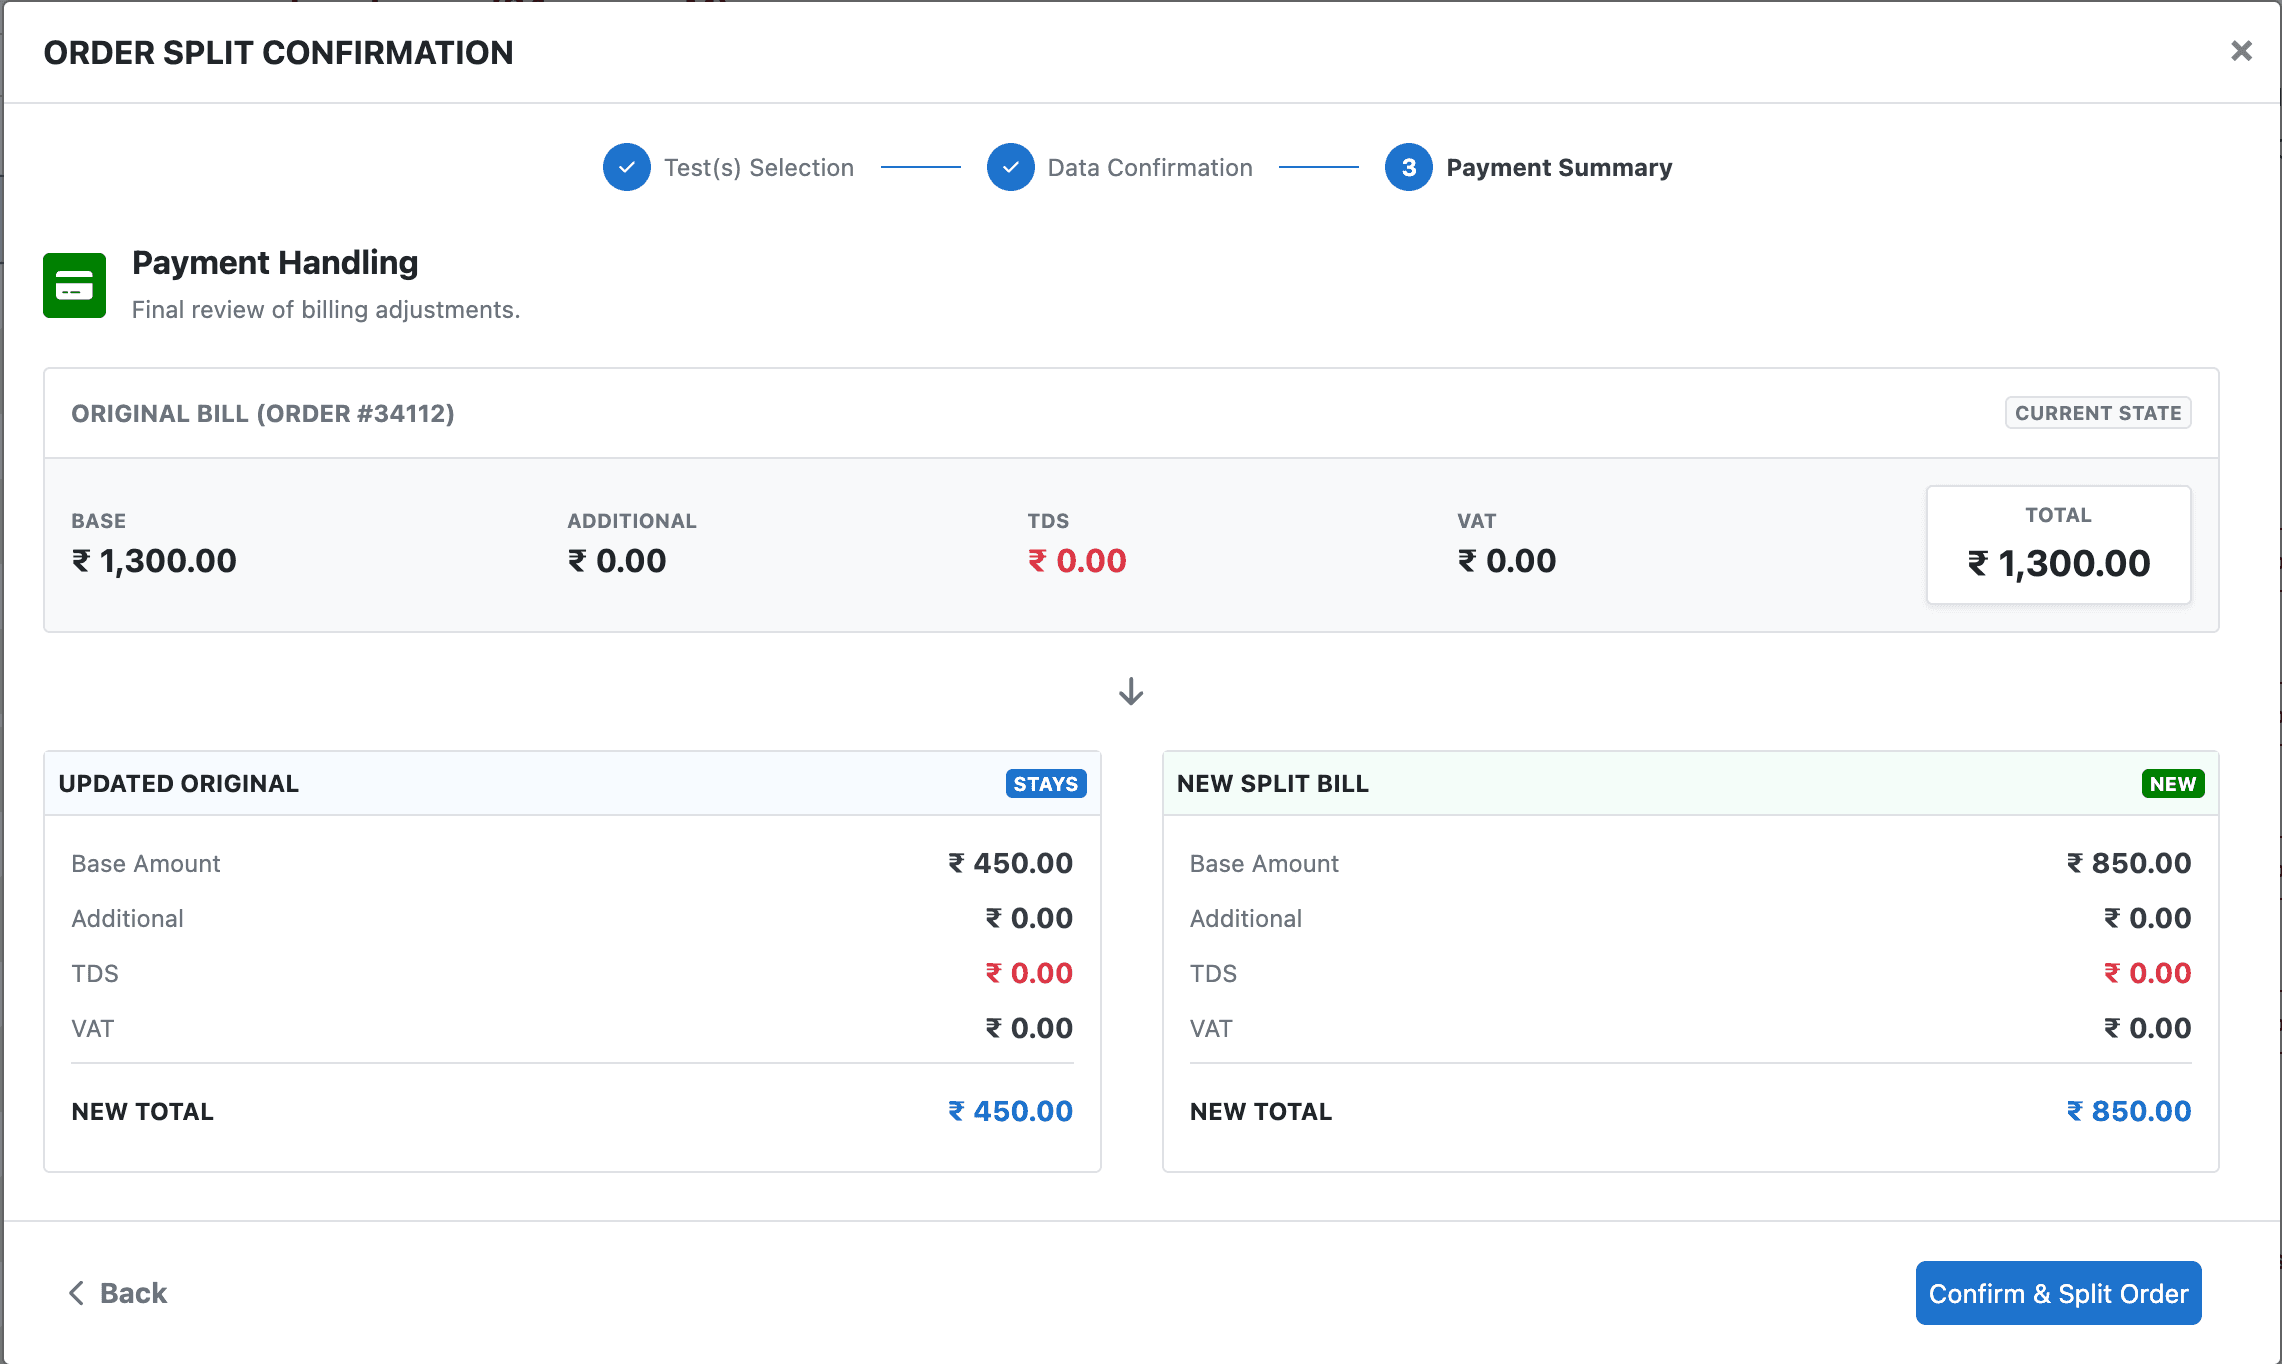
What this screen shows
- Original Bill (Current State) — the bill's current total before split
- Updated Original — what the parent bill's amounts will be after the split (stays)
- New Split Bill — the projected financials for the newly created bill
All values (Base, Additional, TDS, VAT, Total) are displayed for both outcomes so you can confirm the split is financially correct before committing.
No data is written at this stage. This screen uses the is_calculate API mode — purely a preview.
When satisfied, click Confirm & Split Order to execute the split.
6. Split complete — bill list
After confirming, the split executes atomically. The bill list reflects the result.
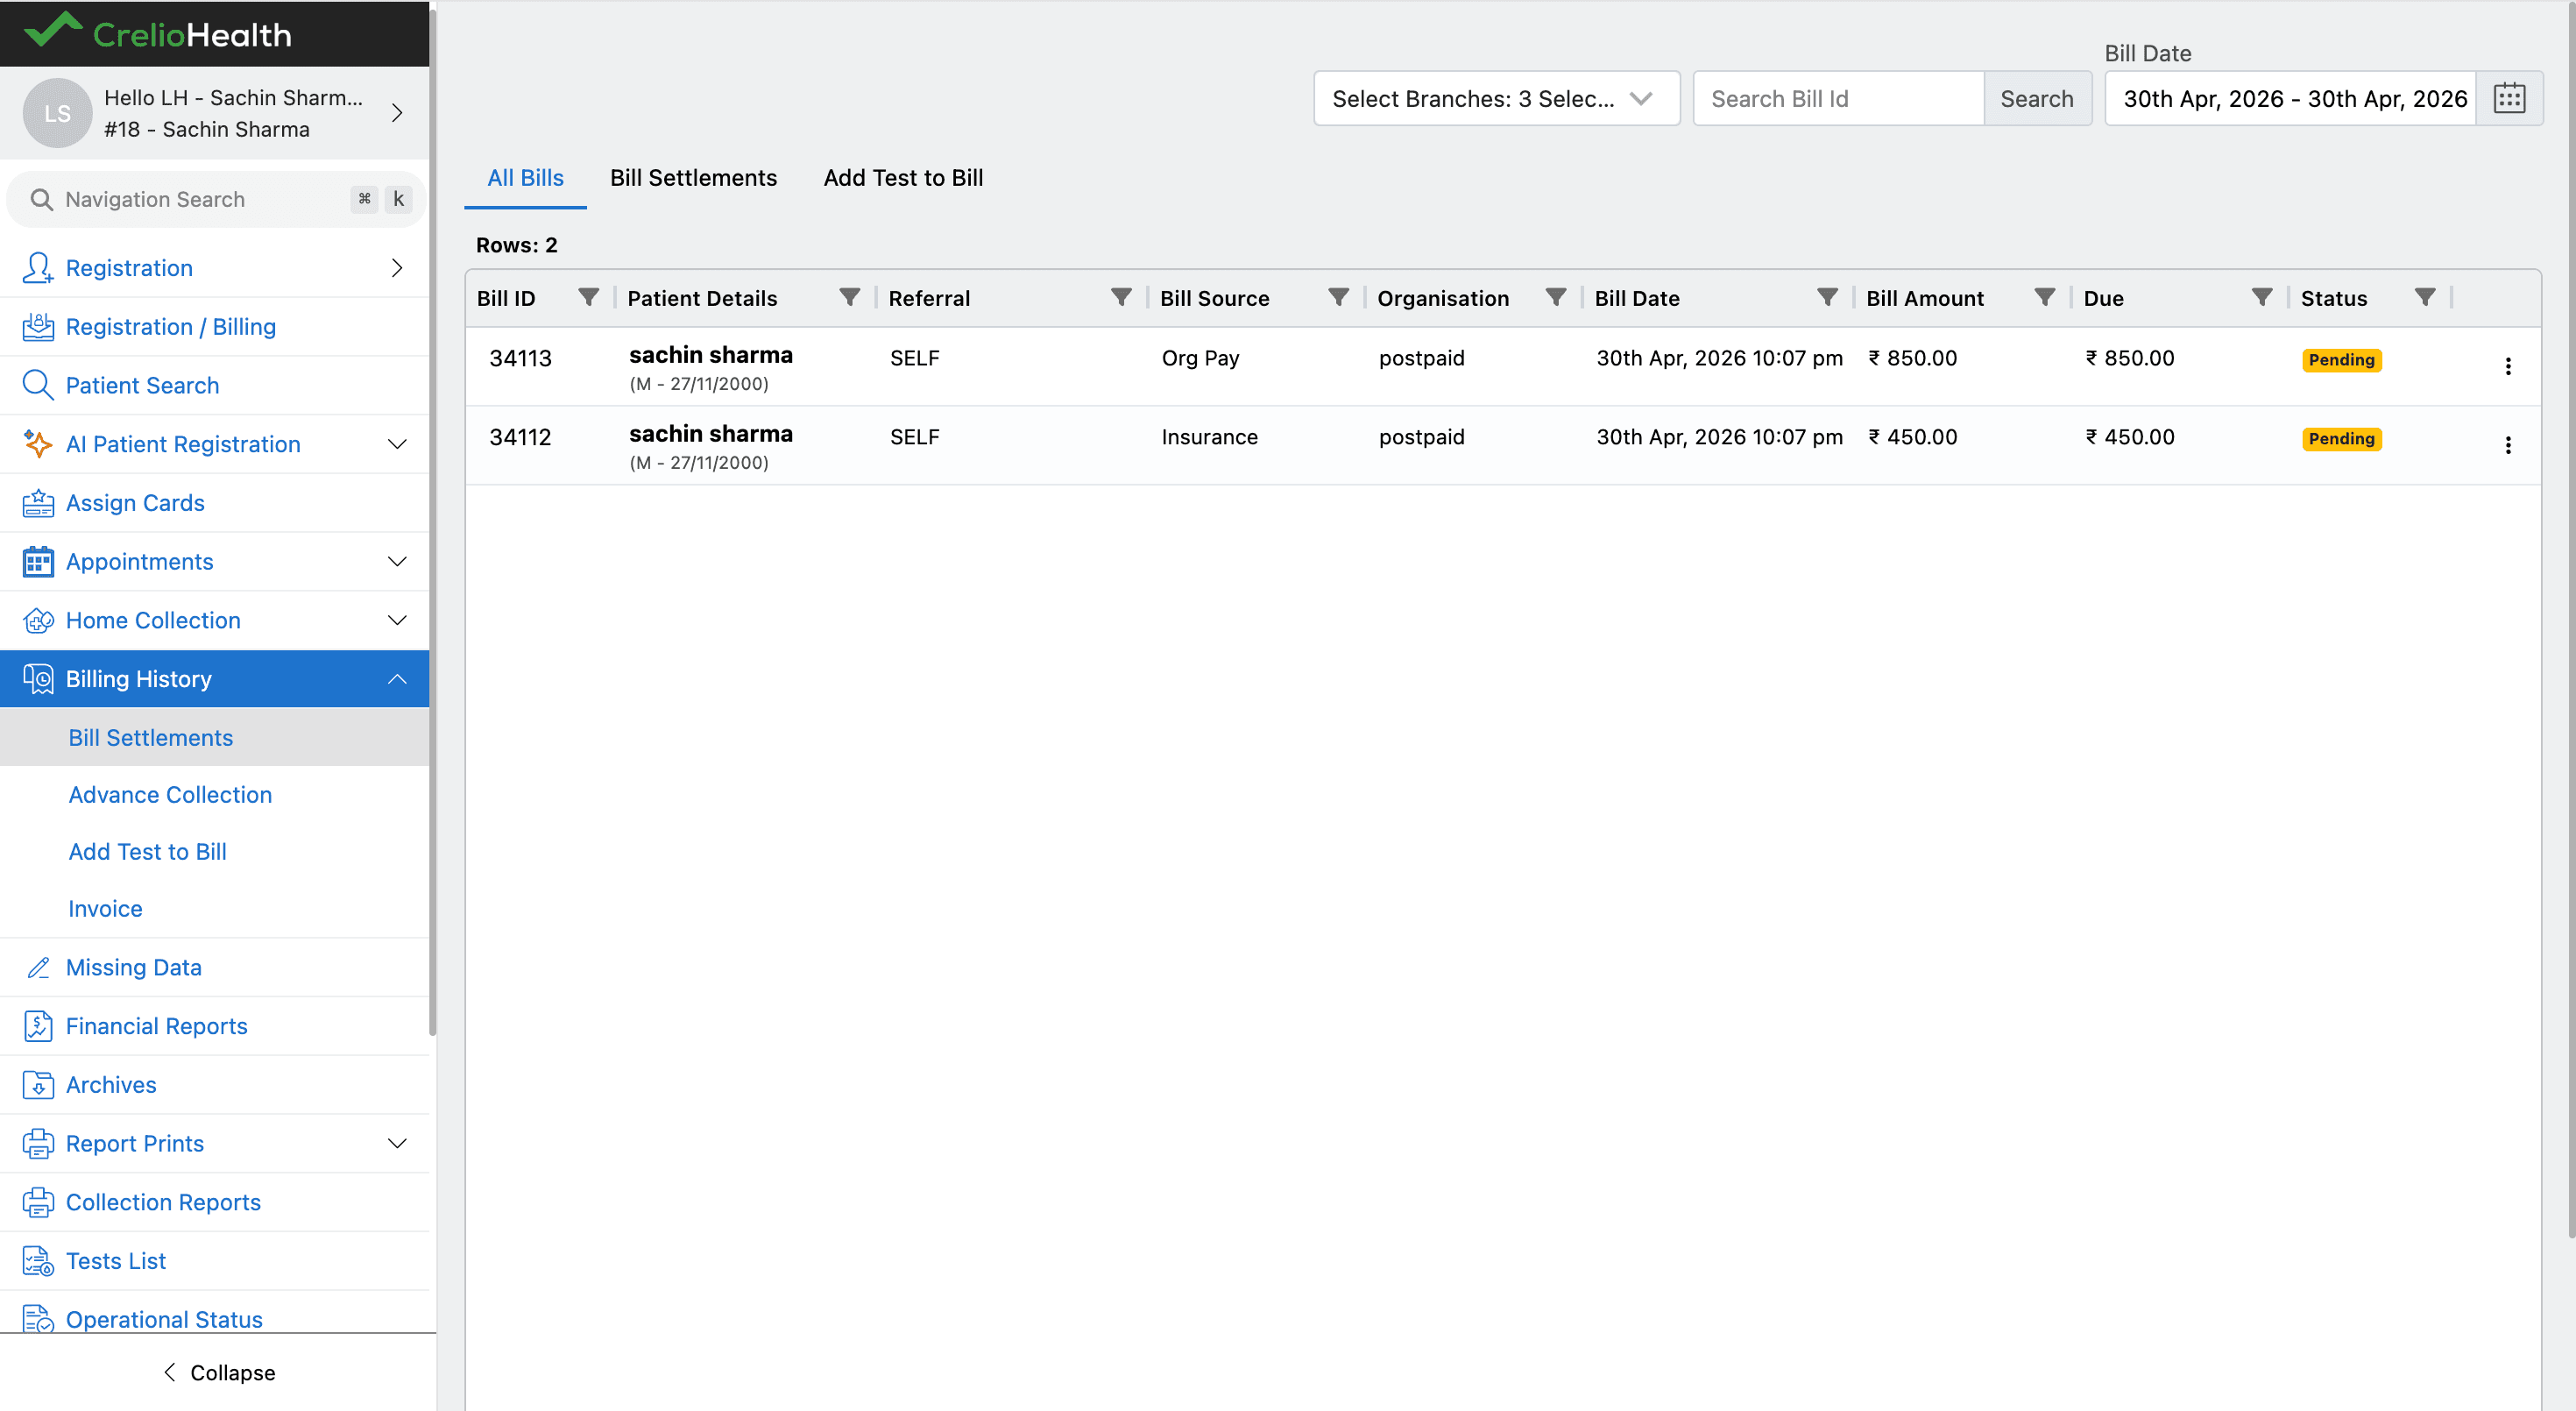
Both bills appear in the list for the same patient:
| Bill | Source | Amount |
|---|---|---|
| New split bill (higher ID) | Org Pay | Amount for selected tests |
| Updated original bill (lower ID) | Insurance | Remaining amount |
The new split bill always appears at the top (higher bill ID, same date).
7. Verify the split bill
Open the new split bill to confirm its contents.
Tests tab — contains only the tests selected in Step 1.
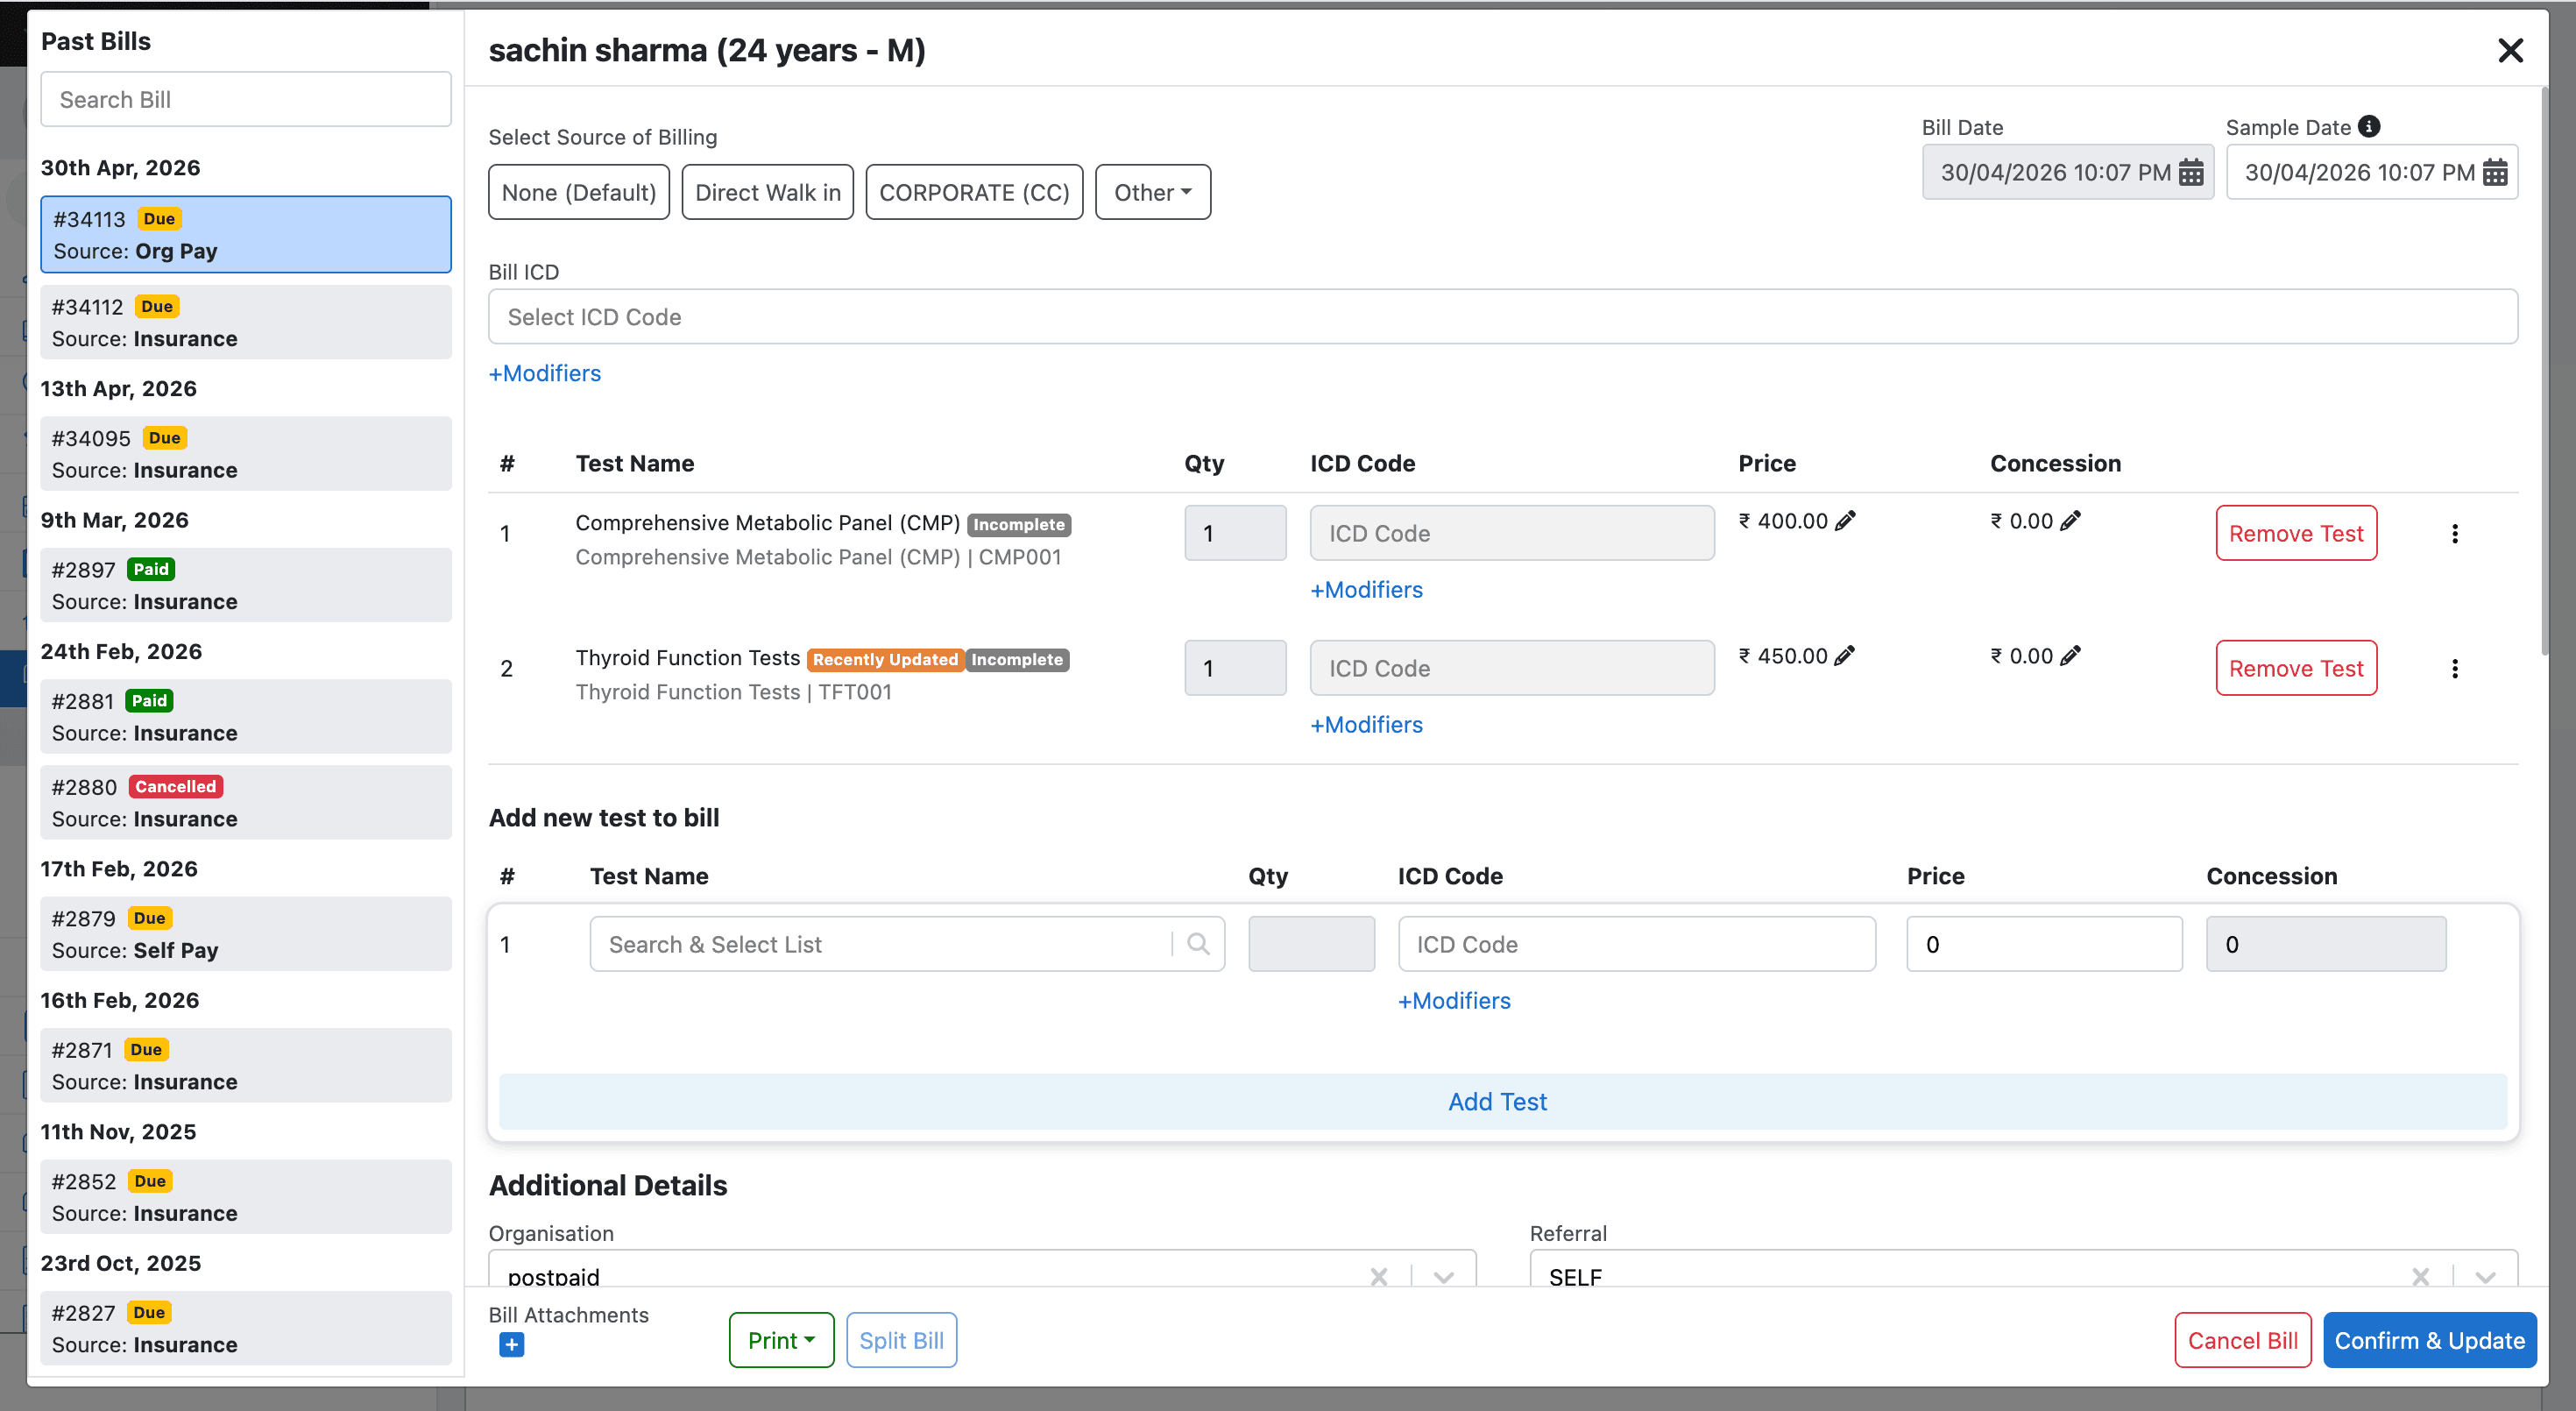
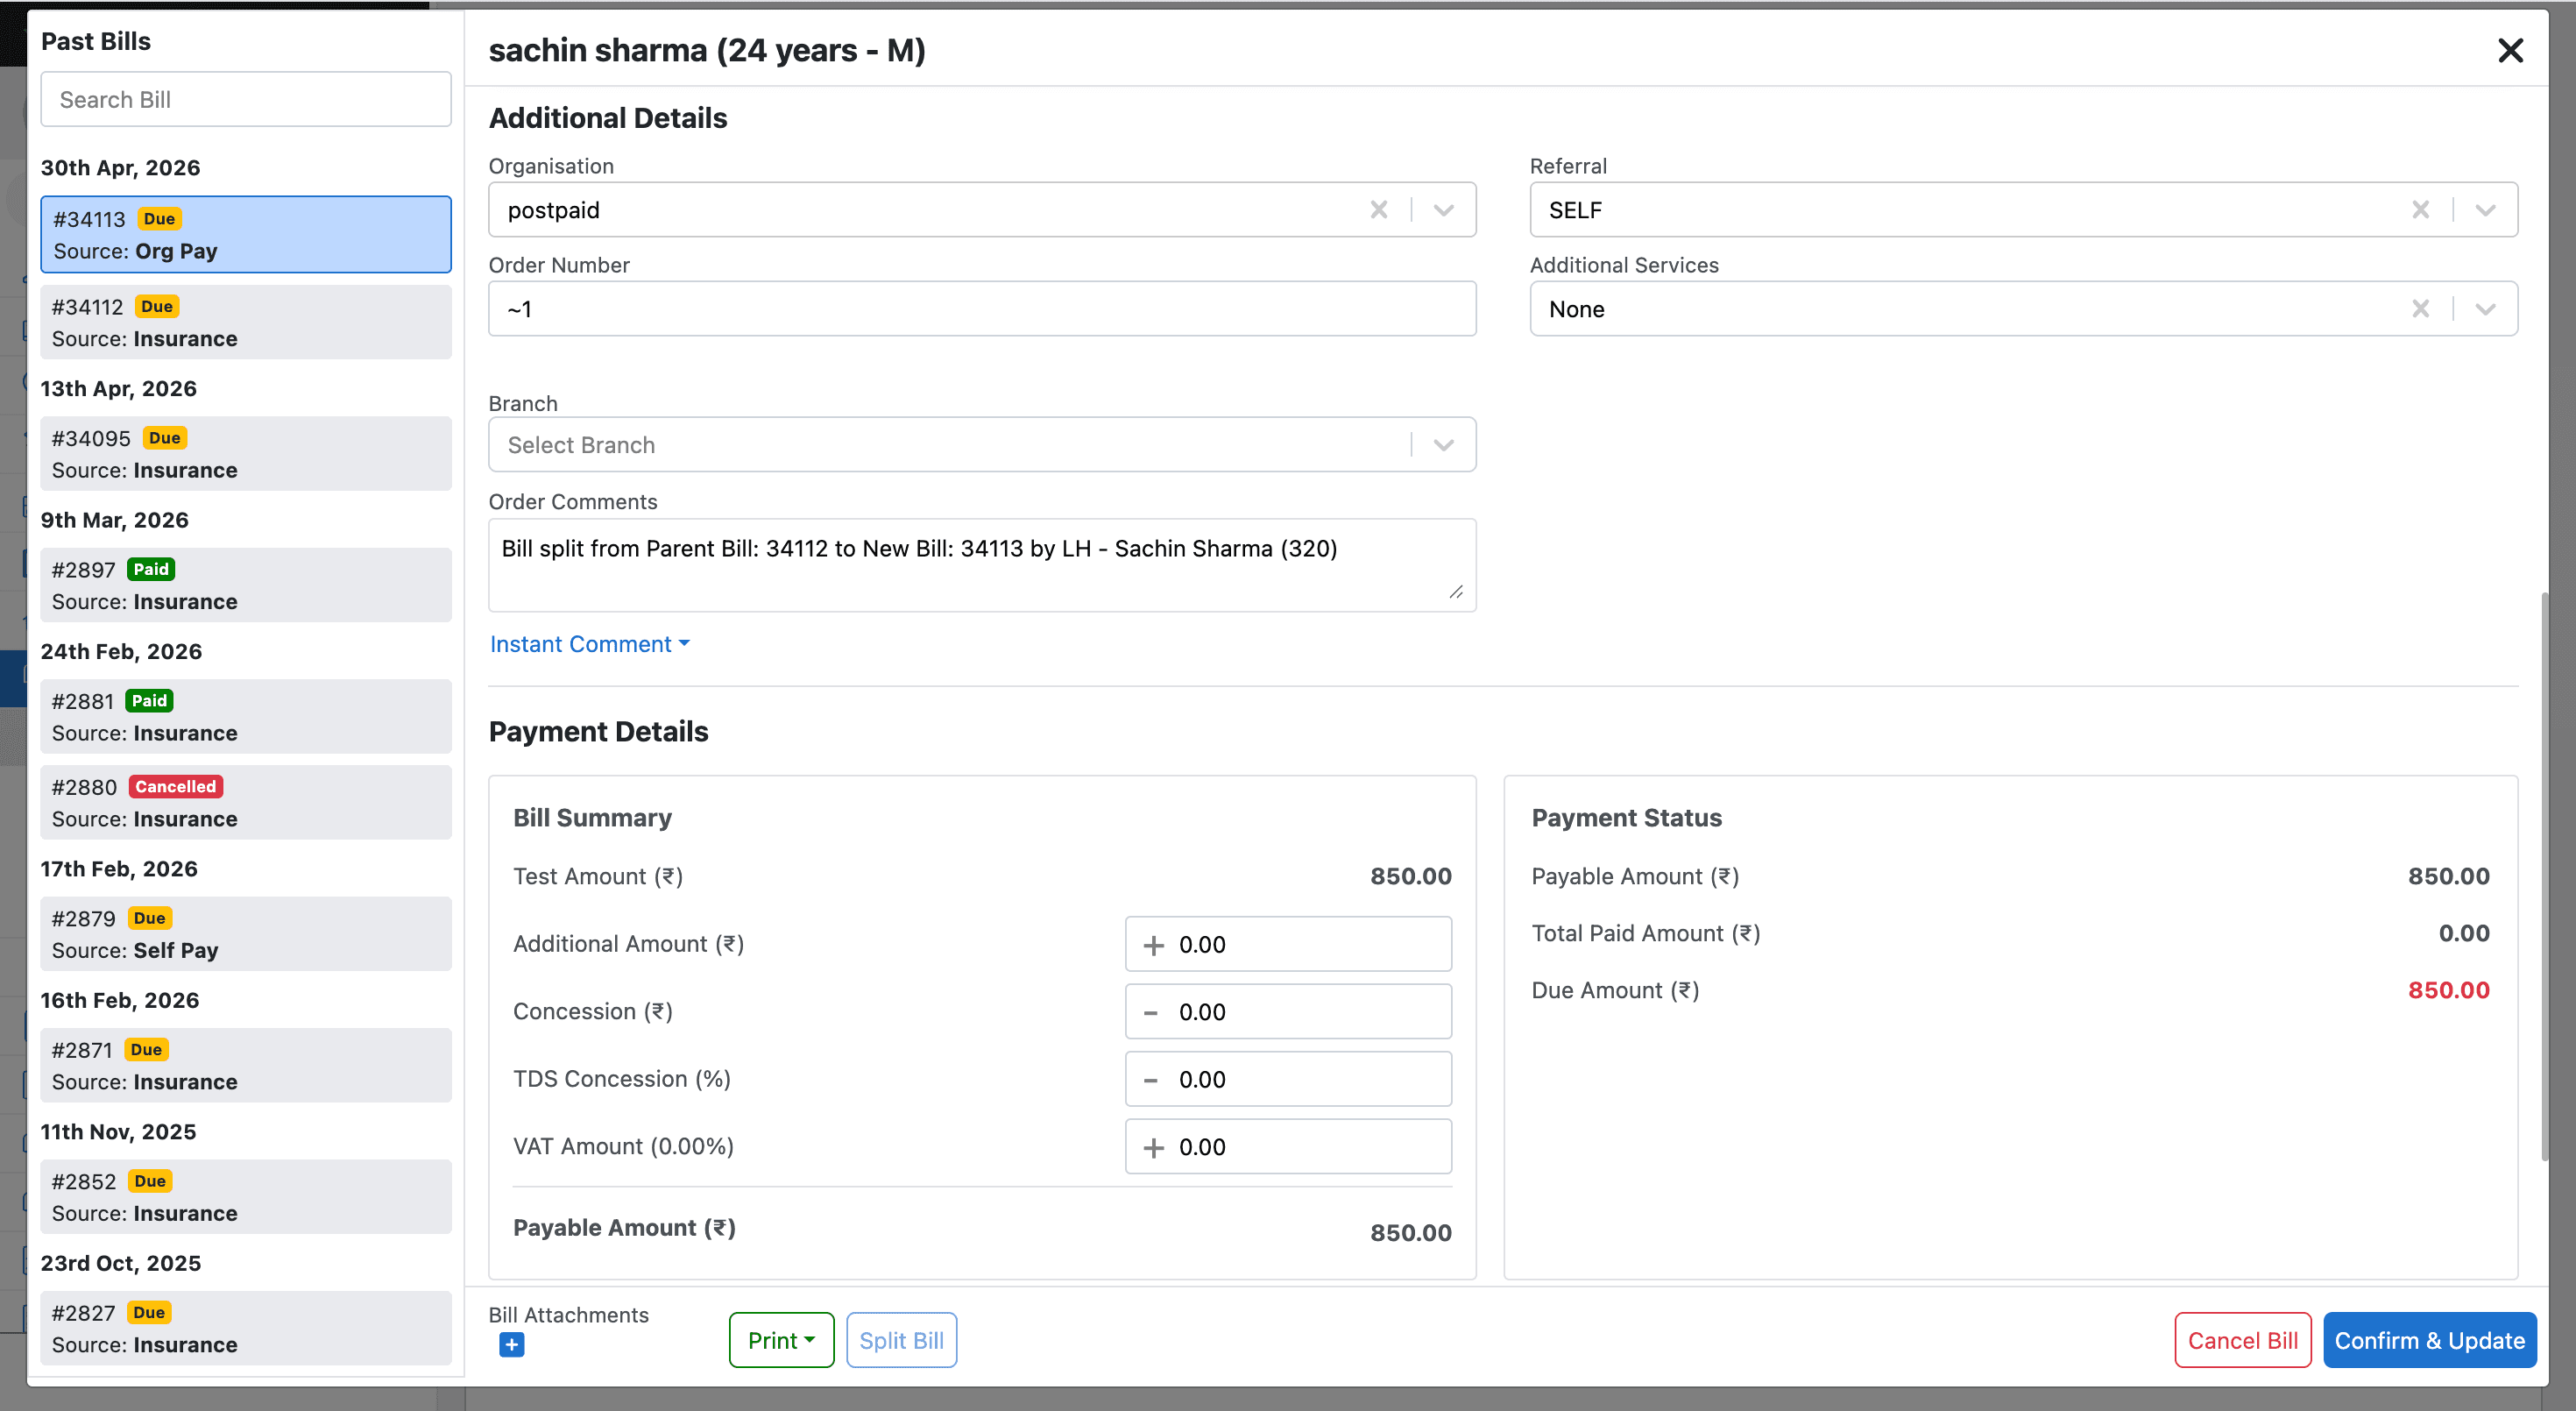
Additional Details tab — shows the order number, billing comment, and final financials.
Things to check
| Field | Expected value |
|---|---|
| Order Number | Parent's order number with ~1 appended (e.g. ~1 if first split) |
| Order Comments | Auto-filled: Bill split from Parent Bill: {id} to New Bill: {id} by {user} |
| Payable Amount | Matches the "New Split Bill" total shown in Step 3 |
| Bill Source | The source selected in Step 1 (Org Pay or Self Pay) |
8. Activity log
Every split action is recorded in the Activity Log with two entries.
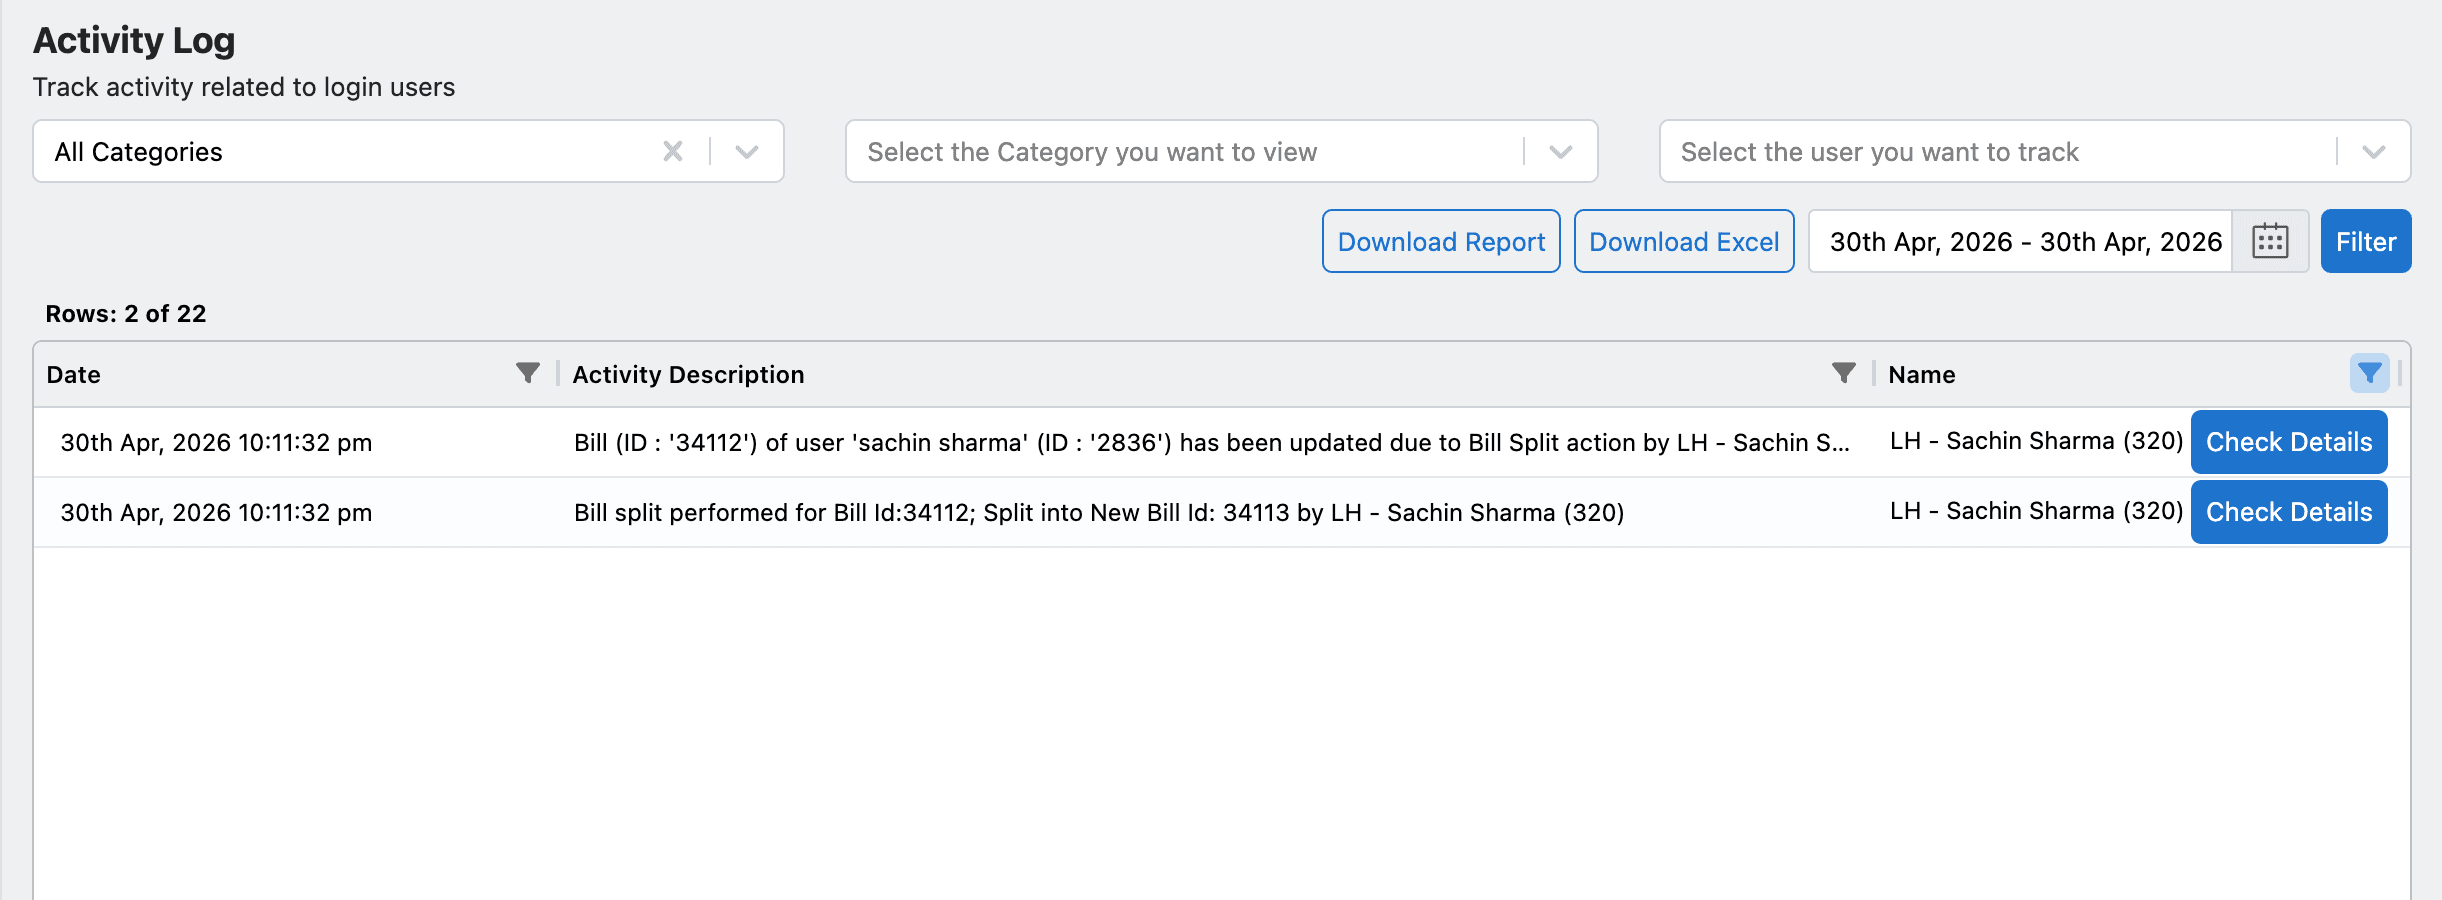
| Entry | Description |
|---|---|
| Bill split performed | Records the split action on the new split bill — includes parent and new bill IDs and the actor |
| Bill updated due to split | Records the update on the original parent bill caused by the split action |
Access the Activity Log from Archives → Activity Log and filter by date or user to locate the entries.
Operational checklist
Enable Bill Splittingflag is on before attempting a split- Only unpaid insurance bills show the Split Bill button
- At least one test must remain on the original bill after selection
- Step 2 confirms which data transfers, copies, or stays — review before proceeding
- Step 3 is a preview only — nothing is written until Confirm & Split Order is clicked
- Smart Reports on the parent are soft-deleted; regenerate reports on both bills after split
- Two activity log entries are created for every split — one for each bill