Workflow Guide
Step-by-step operational guide for enabling, backfilling, repairing, reading, and exporting Antimicrobiogram.
Workflow Guide
This page explains the feature the way an engineer, support person, or product owner would mentally walk through it in real life. The goal here is not just to say what the code does. The goal is to make the lifecycle easy to follow:
- how the feature gets enabled
- how the first data arrives
- how daily freshness is maintained
- how historical corrections are repaired
- how users finally read and export the report
1. Enabling the feature
The feature starts at the Support Dashboard. The toggle is backed by:
labFeatures.is_antimicrobiogram_enabled
When support enables it for a lab, three things matter immediately.
A. The lab now has access to the feature
The flag becomes part of the lab feature configuration. During login/session preparation, the backend places is_antimicrobiogram_enabled into session payloads, and the frontend uses that flag to decide whether the Organism/Antibiotic Results tab should be shown.
B. The feature becomes visible in Operational Export
Once the session carries the flag, the frontend adds the Antimicrobiogram-capable tab to the Operational Export tab in Operations.
C. A historical backfill is queued
Enabling the feature also creates a scheduled crelio_data_migrations entry with:
migration_type = 'ANTIMICROBIOGRAM'is_scheduled = 1job_status = 'Pending'

This is what makes the feature useful right after onboarding. The system does not expect the user to wait weeks for enough new daily data to accumulate.
2. Migration workflow
The migration job is the first big batch load for a lab.
Business expectation
If the lab enables the flag on 2026-04-08, the system should prepare a one-year historical window:
- start =
2025-04-08 - end =
2026-04-08
That range is queued through crelio_data_migrations and later executed by the Antimicrobiogram migration processor.
What the migration processor does
When the scheduled migration runner picks up that row:
- it resolves the lab and the backfill date range
- it marks the migration as running
- it calls the summary builder for the requested window
- it updates migration tracking so the job lifecycle is visible to support and engineering
- once the run finishes, the queued migration work is treated as consumed and cleared from the active queue lifecycle
In practical terms, migration is the "bring this lab up to speed" path.
3. Daily workflow
Daily processing is what keeps the feature current. The intended run model is straightforward:
- run once every day
- choose a scheduled time, for example
02:00 - convert the window using the lab timezone
- process the previous local day only
Example
Say the lab is in a timezone where the daily job runs on:
2026-04-09 02:00
The processed data window should be:
2026-04-08 00:00:00 through 2026-04-08 23:59:59
The backend converts that local-day window into UTC and uses it to select the relevant billing.billTime slice.
Why this is a strong design
This keeps the job:
- predictable
- small
- timezone-safe
- easy to rerun if needed
It also makes reasoning about freshness simple. If the user asks, "when does yesterday appear?", the answer is: after the next daily Antimicrobiogram run for that lab.
4. Repair workflow
Repair exists for historical corrections. This is the part of the feature that makes it feel production-grade. Historical summary tables are only trustworthy if they can respond to meaningful updates in past source records. Antimicrobiogram does that with trigger-driven repair queueing.
5. Billing trigger workflow
The billing trigger is:
trg_antimicrobiogram_billing_update
It runs:
AFTER UPDATE ON billing
What it watches
This trigger is intentionally focused. It queues repair when:
isCancelchanges
That is the right business choice. A bill cancellation can change whether the record should contribute to Antimicrobiogram analytics for that historical day.
What it does step by step
- checks whether
labFeatures.is_antimicrobiogram_enabled = 1for the lab - checks whether
OLD.isCancelandNEW.isCancelare different - derives the affected day from
NEW.billTime - constructs:
start_time = that day 00:00:00end_time = that day 23:59:59
- skips present-day rows
- inserts or re-queues a
PENDINGrow intoOrganismAntibioticSummaryRepairQueue
Why this trigger matters
Without this trigger, a historical bill cancellation could leave the summary matrix out of sync with the real transactional state until someone manually repaired it. With the trigger in place, the repair path becomes automatic.
6. LabReportRelation trigger workflow
The report-side trigger is:
trg_antimicrobiogram_lrr_update
It runs:
AFTER UPDATE ON labReportRelation
What it watches
This trigger covers report-level changes that can affect whether a row should be part of the summary or how it should be attributed. The watched fields are:
dismissedsampleRedrawFlagorgId_idreportID_idreportFormatId_idcompletedTestsisSignedisSyncedisPartialFill
Why these fields matter
These fields directly affect reporting semantics:
- whether a report should count
- which organization it belongs to
- whether it is complete and ready
- whether it has been signed or synced
- whether a redraw or dismissal changes its reporting meaning
What it does step by step
- checks whether the lab has Antimicrobiogram enabled
- compares the watched old/new values
- if none of them changed, exits quickly
- fetches
billTimeandlabTimeZone - derives the historical day window tied to that bill
- skips present-day rows
- inserts or re-queues a
PENDINGrepair row inOrganismAntibioticSummaryRepairQueue
7. Why both triggers are needed
It is worth calling this out clearly.
The billing trigger and the labReportRelation trigger are not duplicates. They cover different classes of historical change.
| Trigger | Best at capturing |
|---|---|
| Billing trigger | Bill cancellation changes |
| LRR trigger | Report completeness, ownership, visibility, signing, syncing, and redraw changes |
Together they make the repair system robust.
8. Repair queue processing
Once the trigger writes a row to OrganismAntibioticSummaryRepairQueue, the repair processor takes over.
That queue row contains:
lab_idstart_dateend_datestatus- timestamps
The queue lifecycle is:
PENDING- picked by queue processor
PROCESSING- summary window rebuilt
COMPLETED
If a row is re-queued for the same window before processing, the trigger logic pushes it back to PENDING, which keeps the repair path simple and resilient.
9. One-day rebuild behavior
The rebuild unit for repair is intentionally one day.
That is important because it gives a nice balance:
- small enough to run quickly
- large enough to fully repair the affected historical slice
When a repair job runs for a day, it removes the existing summary content for that day and rebuilds it from source report values. That means the result is deterministic and easy to reason about.
10. User-facing report workflow
After data exists, the user-facing flow is simple.
Step 1: Open Operations module
The user goes to Operations and opens:
Operational Export
Step 2: Open Organism/Antibiotic Results
The user opens:
Organism/Antibiotic Results
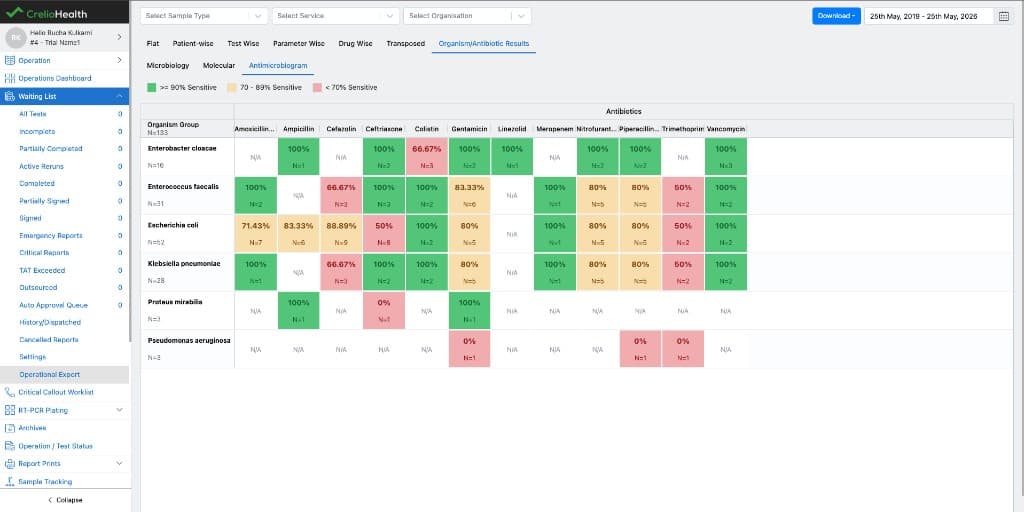
Step 3: Choose the sub-tab
The screen offers:
MicrobiologyMolecularAntimicrobiogram
The Antimicrobiogram sub-tab is the aggregated matrix view.
Step 4: Default organization is selected
The frontend loads the result set, derives the available organizations, and automatically selects the first organization that has data. This keeps the initial user experience smooth. The user lands on a meaningful view without needing an extra manual step.
Step 5: Apply filters
The user can refine the report using:
- date range
- sample type
- service
- organization
Step 6: Read the heatmap
The matrix now shows:
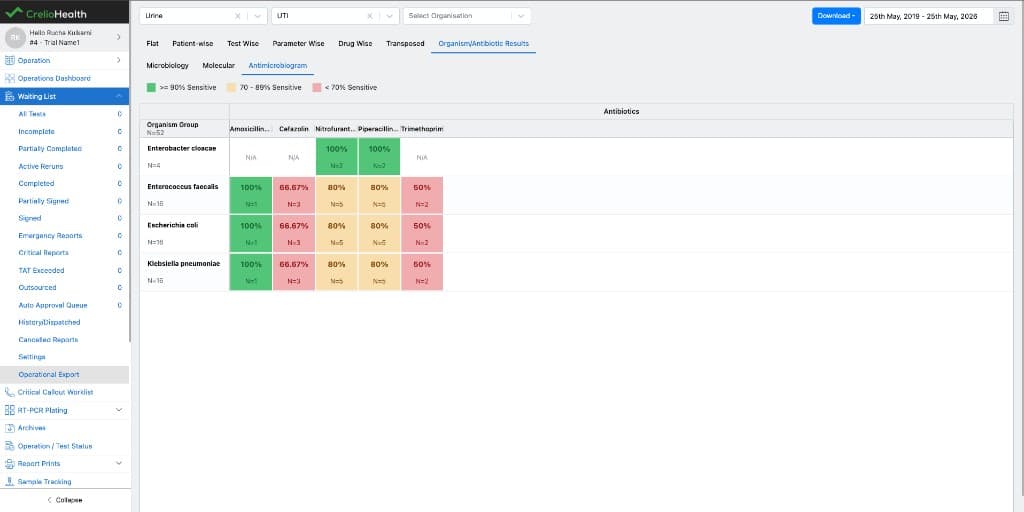
- organisms as rows
- antibiotics as columns
- sensitivity percentage in each populated cell
- N alongside the row/header context
Step 7: Export
The user can download the visible matrix as Excel.
11. Export workflow
The export path is intentionally straightforward.
When the user clicks Download -> Excel, the system exports:
- the visible heatmap
- organization metadata
- selected date range
- sample type
- selected service
- generated timestamp
- heatmap legend
This makes the export immediately shareable. It is not just a raw grid dump; it carries the context needed to understand the sheet later.
12. Full feature lifecycle in one story
Here is the whole feature as one operational story:
- support enables Antimicrobiogram for a lab
- the lab feature flag is saved
- session payloads begin exposing
is_antimicrobiogram_enabled - a migration row is queued to backfill history
- the migration processor fills the summary table for the historical window
- the daily processor keeps adding the previous day's report slice
- if a historical bill or report changes, the billing/LRR triggers queue a one-day repair
- the repair processor rebuilds that day
- the frontend reads summary rows and sensitivity groups
- the user sees a clean organization-wise heatmap and can export it
That is the end-to-end workflow the feature was built to deliver.
13. Quick operational checklist
If someone is validating the feature end to end, this is the shortest good checklist:
- confirm
is_antimicrobiogram_enabledfor the lab - confirm the session carries the same flag
- confirm migration or daily jobs have populated
OrganismAntibioticSummary - confirm historical updates create repair queue entries
- confirm the repair processor clears pending rows
- confirm the frontend auto-selects an organization and renders the heatmap
- confirm Excel export works with the expected metadata